EFFECTS SIMULATION BLOG
THE MILLS MENTORED PROJECTS
FINAL RENDER
10/2/2017

Using GasDisturb Microsolver and vdb to for collision objects to get nice curls
CREATING SWIRLY SMOKE
"THE BALL"
EFFECTS SIMULATION PLAN AND CONCEPTS
GOAL:
CREATE RIGID BODY, SMALL DUST EXPLOSION, AND DEBRIS FROM CONTACT OF THE BALL ON THE GROUND
METHOD TO BE USED:
RBD FRACTURE: CUSTOM PAINT DENSITY TECHNIQUE TO BREAK FRACTURE'S UNIFORMNESS
PARTICLES: SPAWN PARTICLES FROM SURFACE BASED ON VELOCITY BY USING POINTS FROM DEBRIS SOURCE
PUTTING TOGETHER IDEAS
REVIEWING PAST WORKS AND COMBINING TECHNIQUES
9/20/2017
First day of this project, I discussed with Sonali about the idea what will happen for the scene and we agreed to have a ball with rock texture rolling from a bench, falling down and break into pieces with some dust effects.
I started to explore my options and looked back into my previous RBD stuffs in the past including old files,
and my reel that contains RBD parts, etc.
I finally found a solution to once again use the Fracture "Density Painting" technique covered by Jean-Michel Bihorel at Plural Sight which I've been using for a couple times already for: a Santa Monica College's Digital Effects class taught by Rachael Campbell and the VSFX 721 Houdini Class at SCAD with Professor Fowler.
Combine with the new technique I recently studied during this past summer
from the cool Steven Knipping's Applied Houdini Dynamics series.
"RBD Project at Santa Monica College's Digital Effect class" 2013
RBD FRACTURE SET UP
CREATE CUSTOM FRACTURE OBJECT TO BREAK
9/21/2017
To avoid having broken pieces to have same or similar size as regular voronoi fracture would do,
which causes an unwanted uniform look,
I use this method to create a "CUSTOM PAINT DENSITY" for the ball fracture.
It's been helping me really well to keep my art direction under control easily and effectively.

Custom "Paint Density" Network
STEPS
1. USE PAINT NODE TO PAINT THE BALL TO BLACK AND APPLY SOME SPECIFIC PAINT
TO THE BREAKING DESIRED AREA
2. USE SCATTER TO CREATE POINTS
3. ADD VORONOIFRACTUREPOINTS
AND CREATE ANOTHER SET NODES TO MERGE AS A SECOND LAYER
4. ADD VORONOIFRACTURE TO THE END

Results
RBD SIM
CREATE RIGID BODY SIMULATION
9/22/2017
My RBD sim set up for this project is pretty simple. I used RBD Glued Objects for the ball
and specifically for this test I just added velocity a bit in -Y in rigid source node to make it fall down.
I also Fetched Unpacked Geometry from Dop in dopimport node to get the point velocity back before cache it out.
RBD SIM
PARTICLE SET UP
SPAWN PARTICLES FROM SURFACE BASED ON VELOCITY
9/23/2017
PLAN FOR PARTICLE SET UP
GET POINTS FROM THE ACTIVATED BROKEN PART OF PIECES BY USING DEBRIS SOURCE NODE
FADE OUT PARTICLES WHEN DIE USING ATTRIBWRANGLE
USE THAT PARTICLE SET UP TO SIM AS A SOURCE
Particle Source Set Up
1. Create a particle source geo using object merge to import rbd dop cache in
2. Create a debrissource to get particles emiting from from pieces
3. Use pointvop and add turbnoise to tweak velocity (pic below)
4. Use attribwrangle to fade particles when die (pic below)
5. Cache out to be used as source for sim

SMOKE SETUP
SET UP VOLUME SOURCE
9/23/2017
PLAN FOR SMOKE SET UP
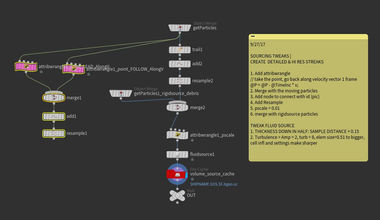
BRING IN THE CACHED PARTICLES AND ADD FLUIDSOURCE TO USE AS A VOLUME SOURCE
CONVERT RBD CACHE TO VDB FOR COLLISION
DO SMOKE SIM USING VOLUME SOURCE
VOLUME SOURCE SET UP
Add object merge bring in particles
Add attrWrangle to set pscale
@pscale = 0.1 * @pscale;
3. Add fluidsource
Check ON using noise, curl noise to add details and make it more interesting.
Turbulence, grain up and element size smaller to add details

MATCHED ANIMATIONS
9/25/2017
MATCHED ANIMATIONS SUCCESS!!
I just tested combining together 2 animation balls to match between keyframe animation rolling ball that Sonali did to match with my RBD explosion, between Maya and Houdini.
In Maya, I imported my explosion cache fbx file and increased the ball size to match the position and size of Sonali's ball
and move her keyframes back to negative numbers
until the ball matching seemlessly.
I also used technique Key on/off visibility to swap between 2 balls.
I found my ball from houdini has a bit rough surface and had to go back to fix and bring back into maya again.
Check it out!!
Progress Blogs for "The Ball"


